The minute you throw a bunch of beverages and ice into a cooler, you’re in a race against the clock. That ice is going to melt, and your beer and soda are going to mercilessly lose heat until they’re lukewarm. But there are ways — a lot of ways — you can keep things frostier for much, much longer. All you need to do is follow these clever tips and you’ll become the king of, uh, cool (eesh).
Two factors determine how cold your cooler stays: preparation and air. We’ll start with the prep, part of which is extremely obvious: Stick every drink you’re bringing in the fridge for the night. If you’re going camping or taking a long trip, freeze whatever food that can be frozen and that you’re not planning on eating soon.
What you’re probably not doing, though, is cooling the cooler. “The cooler itself needs to be brought down to temperature,” says Michael van Vliet, who co-founded the culinary camping site Fresh Off the Grid in 2015 with Megan McDuffie, which shows you how to make some pretty stunning recipes, even during long camping trips (meaning he’s had plenty of experience keeping cold food cold for as long as possible).
“If you store the cooler in a shed or your garage, it’s going to be pretty warm, so when you put ice and food in there, they’ll immediately begin to warm up,” he says. In addition to bringing the cooler in from the garage the night before and letting it bask in your air conditioning overnight, make sure you cool down the inside of it, too. “The day before the trip, fill up your cooler — I mean full — with ice or ice water and let it sit in there, overnight. That’s going to bring the interior of the cooler down to a very cold temperature.” Then, when you’re ready to go, dump that semi-melted ice and water and use a bag of fresh ice to pack up your goods. van Vliet calls it “sacrificial ice.”
When it’s time to get going, loading up your cooler should be the last thing you do, because you want to utilize every second of coldness the ice can provide. Again, once you’ve packed up, you’ve started a countdown to room temperature. If you’re driving, slow it down by putting the cooler inside your air-conditioned car instead of the stuffy trunk, particularly if the sun’s turned it into an ersatz oven. Once you arrive, place the cooler in the shade, under trees or even under a picnic table, to keep the sun’s rays off it.
But the biggest factor that affects how long the items in your cooler stay cold is air. “The way you lose the most cool in your cooler is when you’re opening it,” explains van Vliet. “Air has got very poor thermal mass so it can very quickly change temperature. When you open the cooler up, the warm air outside is going to warm the cool air inside quickly.” The first and simplest way to combat this heat loss is to leave as little room for warm air to enter as possible. “That’s why a full cooler is more efficient than a half-empty one.”
Warm air makes the ice melt faster, naturally, so van Vliet uses a sheet of block ice as the bottom layer of his cooler. Block ice has less surface area than crushed ice, which means it melts more slowly. You can usually find it at some grocery stores, but if there isn’t any in your area, it’s simple to make at home: Just fill some baking pans with water and stick them in the freezer. A day later, you’ve got block ice. Oh, if you’re thinking you can beat the system by only using block ice in your cooler, think again — remember, air is the enemy, so you’ll still need to fill every possible nook and cranny in your cooler to keep things as efficiently cold as possible.
The next step is to minimize the time warm air has to intrude, which means stopping people from leaving the lid open to stare at the cooler’s contents, then scavenging through the ice like Arctic explorers searching for sunken treasure. It’s all about making it as easy as possible for people to find what they want to drink as quickly as possible, and van Vliet may have found the perfect packing solution.
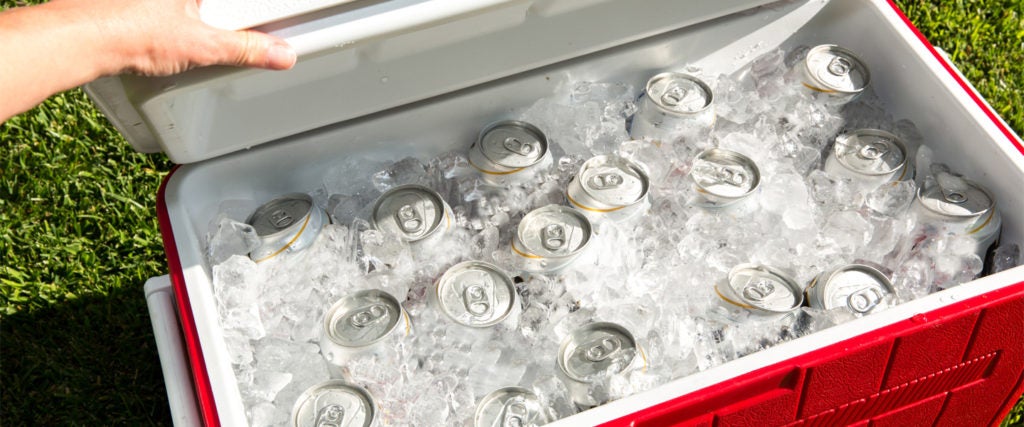
First, he chooses to pack cans whenever possible, because that maximizes how many drinks he can bring. On top of his block ice, he lays all his cans horizontally, in solid columns, which are also flush with each other. Then he covers that with 1½ to 2½ inches of crushed ice, followed by another layer of cans, and so on. Ideally, you want to have a 50/50 ratio of ice to drinks or food. If you believe this is sacrilege because you think every beverage has to be completely surrounded by ice, you’re wrong. “The melted ice water will eventually go between the cans, and that will be sufficient to evenly cool everything,” van Vliet says. Laying the cans on their side has its own an enormous benefit, too: It means the labels are all clearly visible, so people can find their beverage of choice — and thus close the lid — in a snap. No need for people to pull out drinks and then push them back when they’ve grabbed something they didn’t want.
Make sure, however, not to store each type of drink by layer, “so people don’t have to work through three layers of Bud Light to get down to the IPAs,” warns van Vliet. Designate a section of the cooler for each drink, so people always know where they should be hunting for their beverage. If you want to go the extra mile, you can make a map of the drink sections and tape it on top of the cooler, so people already know where they can grab their cans before they even open the lid. It may only save a few extra seconds, but all those seconds will add up, and keep things cooler longer.
All this holds true if you’re packing food (especially if it’s for an extended amount of time), but there are a few other tricks to know, too. Take off all extraneous packaging to keep that wasted air out and make sure everything is sealed watertight. Then make a meal plan, so the food you know you’re going to eat at the end of the trip can be put on the bottom layer, where it will stay coldest the longest. “It’s a good idea to have a cooler for drinks and a second cooler for just food,” adds van Vliet. “You’re going to be going into the drinks cooler much more frequently. Also, cool-but-not-cold beer is fine, but cool-but-not-cold chicken could be trouble.”
Use van Vliet and McDuffie’s tips and your beverages will keep cold longer, even if you have one of those cheap, plastic coolers that don’t have any seal whatsoever, allowing the cold air you worked so hard to make to seep out constantly. Or, you could go ahead and buy a grown-up cooler, which is to say a rotomolded cooler. The construction process creates airtight seals to keep the cold in, which has the side benefit that the cooler won’t leak if it gets tipped over. Rotomolded will cost you — the cheapest, and thus the smallest, coolers will generally run you more than $100, but you definitely have the opportunity to pay more than $400 if you want.
That price might sound insane, but consider this: van Vliet and McDuffie have been using a Yeti Tundra 35 (currently $250 on Amazon) since 2017. “If you do everything properly, the food goes in cold, you got frozen food in there, you’ve got a good ratio of ice, there’s no reason you can’t be [using] the same ice on day three or four.”
That’s not only amazing, it’s extremely cool. (Pun absolutely intended.)

Rob Bricken
Rob Bricken has been a professional nerd for 20 years, the editor of Gizmodo’s geeky pop culture site io9, and was the creator of the poorly named but fan-favorite news blog Topless Robot. When the zombie apocalypse comes, he’ll be among the first to die.