If you dumped your dealer because you prefer the idea of a homegrown mushroom supply, well, you have your work cut out for you. But with just a few simple tools and some guidance, you can learn how to grow your own shrooms. Open your mind, and prepare to get your hands dirty.
Before all else, remember that growing shrooms is illegal in most states, except for New Mexico. It’s also decriminalized but not legal in some areas of Michigan, Colorado, California and Washington, D.C. While magic mushrooms are newly legalized in Oregon, that only applies to mental health treatment in supervised settings, not growing them in your home.
Nevertheless, since I know everyone reading this lives in New Mexico (right?), here are the supplies you need to grow shrooms:
- Fine Vermiculite: A mineral-based growing medium found at most garden stores.
- Brown Rice Flour: To help form the substrate, the surface on which your mushrooms will feed and grow.
- Water: It should be of drinking quality.
- 5 8-Ounce Jars: Where your shrooms will live for a while. They should each have a lid with four small holes drilled into them.
- Aluminum Foil: To cover your jars.
- 2 Medium-Sized Clear Plastic Storage Totes: For sterilization purposes, and to build your mushrooms a nice home.
- Gloves: To avoid contamination.
- Rubbing Alcohol: To kill unwanted germs.
- Perlite: Another mineral-based growing medium found at most garden stores.
- Spore Syringe: This is where your shrooms begin. There are numerous websites dedicated to selling spore-filled syringes.
Before we learn how to grow your own shrooms, a quick word about cleanliness: In addition to cultivating mushrooms, the process we’re about to go through can also promote the growth of unwanted mold and bacteria, some of which are potentially harmful. You can avoid that by keeping your hands and your workspace as clean as possible.
Now, we’re going to be following a tried-and-true method of mushroom cultivation called PF TEK, pioneered in 1991 by a man named Robert McPherson, aka Psylocybe Fanaticus. Let’s grow some shroomies.
How to Grow Your Own Shrooms
Step #1: Make Your Cakes. To make substrate “cakes” on which your mushrooms will grow, combine 1 cup of water and 2 cups of vermiculite in a large mixing bowl. Then, mix in 1 cup of brown rice flour.
Once you have your substrate mixture, fill one of your 8-ounce jars, leaving a half inch of headspace, and use a dry paper towel to wipe down the unfilled inside lip, which helps to prevent contamination. Fill that top half inch with dry vermiculite, cover and place a breathable (micropore) tape over the holes in the lid. Repeat this process for all five jars.
Finally, cover the top of each jar with aluminum foil.
- Read Next: What to Watch on Shrooms
Step #2: Sterilize Your Cakes. Place a boilable spacer — like a vegetable steamer or more jar lids — in the bottom of a large pot, add a small amount of water to cover the spacer, then load your substrate-filled jars into the pot. The water level should be at the bottoms of the jars to avoid water leaking into them. Cover the pot, and steam-sterilize your jars by boiling the water for 90 minutes at a low but boiling temperature.
Step #3: Inoculate Your Cakes. Remove your jars from the pot, and let them cool to room temperature. While you wait, carve two arm-sized holes in your clear plastic storage container to create an enclosed workspace to help prevent contamination.
Once cooled, place your jars and spore syringe in the container. Put on gloves, and use rubbing alcohol to wipe them clean. Shake the spore syringe to break up any clumps, and use a flame to sterilize the needle. Press the needle into each of the four lid holes, squeezing a small amount of spores toward the edge of the jar every time. Repeat this process for each jar, flame sterilizing in between.
Finally, let the jars sit at between 75 and 81 degrees Fahrenheit for about three weeks. The entire jar should appear white before you move on to the next step. If you see green mold in any of your jars during this time, throw them out. Don’t stress — it happens.
Step #4: Build Your Cake Chamber. Drill plenty of small holes in your second plastic storage container — on every side, top and bottom too — for ventilation. Rinse enough perlite to fill about 5 inches of the container, and dump it inside. Perlite has a large surface area that does a great job of humidifying your container.
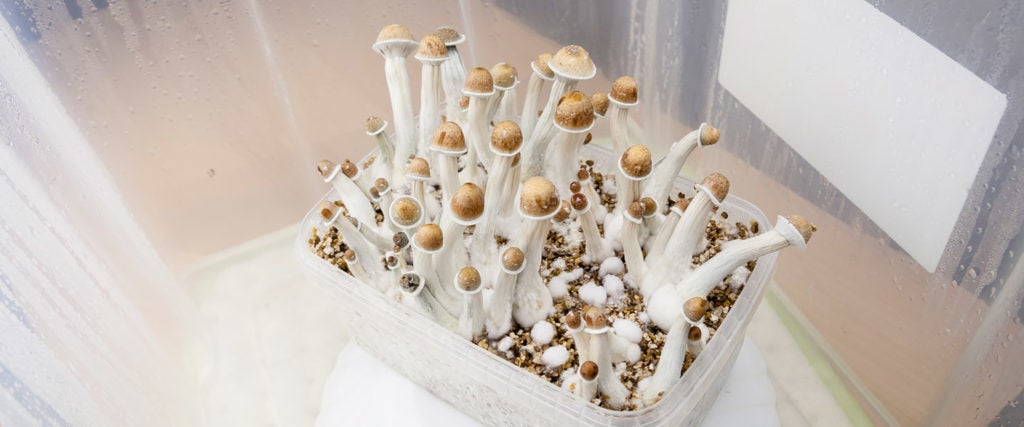
Step #5: Release You Cakes. One week after they’re fully colonized — so about four weeks total in the jars — you should be able to remove each cake by opening the jar, removing the half-inch vermiculite barrier and tapping it against a surface. Once removed, rinse each cake under the faucet, and submerge them in a pot of water for 24 hours. You may need to place some kind of weight, like a plate, on top of the cakes to keep them submerged.
Now, you’ll need to perform the so-called “dunk and roll” technique: Rinse each cake well, roll it in dry vermiculite and gently set it in your perlite-filled chamber. If you want to be extra cautious, you can bake your dry vermiculite at 350 degrees Fahrenheit for about half an hour to kill any germs. After the cakes have been in the chamber for about half an hour, mist them well to moisten the vermiculite, and mist them again several times over the next 24 hours.
For about one week, you should mist your chamber three to four times a day, otherwise keeping it covered. If you live in an especially dry climate or it’s wintertime, you may also want to run a humidifier in the same room as your chamber. Furthermore, your shrooms will need 12 hours of fluorescent light or diffused sunlight per day. (This is why it’s important to have a clear container — so the light can get through.)
Step #6: Harvest and Get High. About one week from their introduction into the chamber, your shrooms should be about ready for harvest. The only thing left to do now is read about how to have a good trip on shrooms and take the journey.

Ian Lecklitner
Ian Lecklitner is a staff writer at MEL Magazine. He mostly writes about everyone's favorite things: Sex, drugs and food.